
Picture this… I’m sitting at the computer squealing with excitement. Yes… I am, because do I ever have a treat for you today! Sarah from Ruffles and Rainboots is my special guest here on The Deliberate Mom!
I have a confession to make… I absolutely adore Sarah. She is sweet, funny, insanely creative, and such a dear blogging friend. I couldn’t be more honoured to share this space with her today. Even more exciting, Sarah is sharing a fabulous handmade ornament for your children to create this holiday season. So without further ado, I would like to hand things over to Sarah!
Crafting with Kids: Handmade Kid Ornaments
Hello, everyone. I’m Sarah. I’m so excited to be here sharing a craft for some handmade kid ornaments with you while Jennifer is writing her novel. As one of her readers, you know how powerful Jennifer’s words can be; how her voice seems to reach through the screen and touch your heart. I am so proud of Jennifer and her decision to join this year’s NaNoWriMo competition and I’m delighted to be a part of her cheering section. While Jennifer is busy typing, let’s wrangle up some kids and make these ornaments.
Before we get to our craft, I should introduce myself. I find myself drawn to create and after having a child, a lot of the crafting I do now centers around our nearly 3-year-old girl, Elise. Over at Ruffles and Rain Boots, I write tutorials for handmade gifts, gifts and crafts for children, dress up clothes, and even games. I also share a bit about our fun-filled days crafting with kids, too – it seems my little one loves to create as much as her mom. Our love of reading gets highlighted when we pair up learning and crafting to share activities that go along with some of our favorite books. Come over and join the fun – we love to make new friends!
While Jennifer is working through her color-coordinated collection of Post-Its, we should gather up some supplies. Most, if not all of these you should have on hand. Here’s what we’re making: handmade kid ornaments.
Supplies
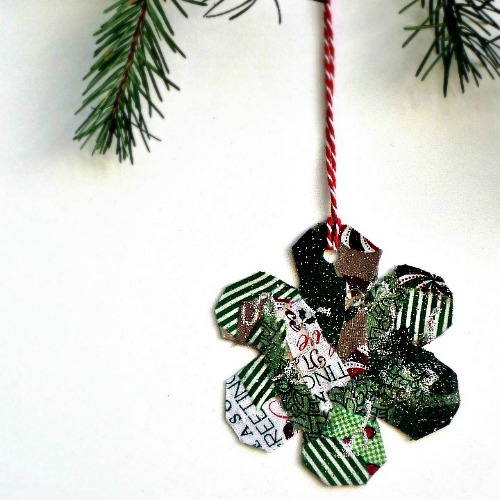
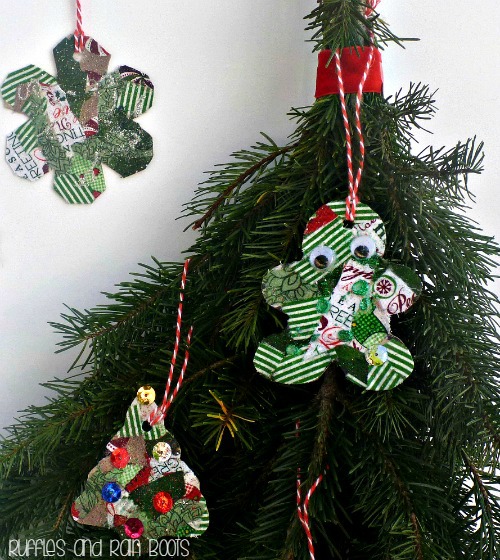
Holiday Shapes to Decorate: You’ll need a cereal box (or other cardboard) and holiday cookie cutters to trace. We celebrate Christmas, so our shapes are from a Christmas-themed cookie cutter set. If you have a paper cutting machine (Cricut or Silhouette) and thick card stock, you could use those. Another idea is to check the dollar and craft stores for pre-made wooden shapes. Most of the time you will have to drill a small hole in these for hanging, but because they are very thin wood, it’s easy to do without power tools.
And that is something my husband is thankful for, because honestly I’m not a gal you want operating power tools. I’ve been known to be a tad clumsy. Back to the supplies…
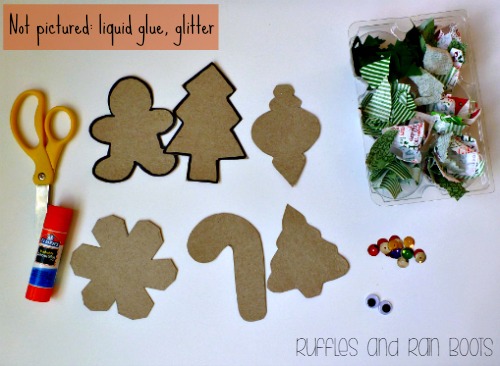
Patterned Material: I chose to set out holiday fabric scraps I had on hand, but you could use holiday-themed scrapbook paper as well. If you don’t have any holiday fabric or paper, run to the craft store and pick up a couple of fabric ‘fat quarters’ – they are inexpensive and there are so many to choose from, both patterned and solids.
Decorations: Elise opted for sequins, googly eyes, glitter glue, and loose glitter, but pom poms, Perler beads, and ribbon scraps are some other items you could set out. I like to use these types of projects to burn through crafting supplies that have been sitting for a while, but you can get most of these items at the Dollar Store (or Target’s Dollar Spot) if you don’t have them on hand.
Other Supplies: safety scissors, glue, ribbon or string for hanging, ModPodge (or diluted school glue)
Ready, Set, Create!
While I was tracing the shapes onto the cardboard, Elise was practicing her scissor skills, cutting the fabric scraps. She needed very little direction from me once I told her that we would be creating some holiday ornaments. She began gluing the fabric scraps to the cardboard cut outs – most of them are completely covered. Here she is crafting on the IKEA table I refashioned for her, complete with some FROZEN friends under the Plexiglass to cheer her on.
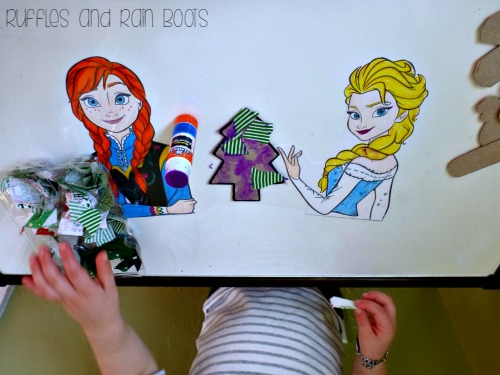
If you have older kids, you can have them trim up the shapes once they are covered. I had to do it for Elise after she got frustrated when she cut up one of the trees too much for her liking.
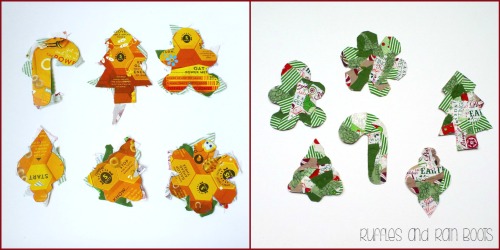
I thought these looked great, but Elise wanted some sparkle, and began gluing on sequins and googly eyes with fervor. We normally use glue sticks, but because glitter was involved, the liquid glue was necessary. The glitter addition was the only part of this craft that got messy but because we’re always covered in glitter ’round here, it didn’t bother us. If you have an aversion (or very young children), take care by helping them or eliminating it. Check out the shirt – this little one is serious about her love of glitter!
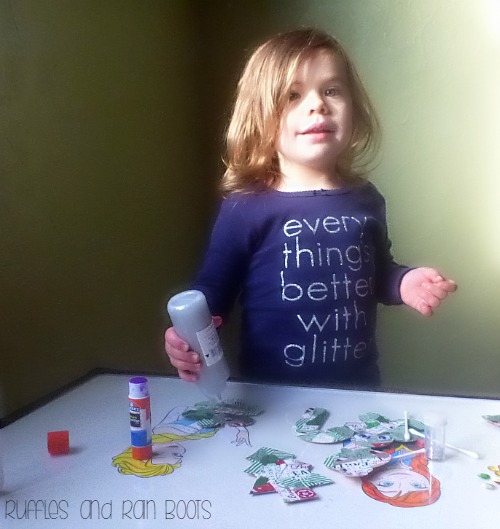
To secure everything to the shape, give it a quick once-over with ModPodge (or diluted school glue). True to form, Elise used a lot of glue, so ours took a couple of hours to dry. Once they did, Elise was smiling as she examined her scrap ornaments.

Here are some tips and suggestions for this project:
- If you’re hosting a family get-together, you could have this quick project prepared for the kids as an activity to help calm them before you sit down for the meal.
- If you’d like to make it more of a keepsake, you could add a photo to the center after the kids have decorated their shapes. You could also write a year or a memory on the back.
- When setting up this project, consider putting the decorating supplies in a cleaned egg carton (cut it in half, if you’d like). When we use a collection of small baubles in a craft, this method helps to keep everything tidy, yet accessible.
- If using glitter, I recommend using plastic shaker-top bottles and only adding a small amount of glitter. We got our tiny bottles in a multi-pack from the Dollar Store and I fill them with glitter for each project.
If you set up this craft for the kids in your life, we’d love to see their creations. Connect with Ruffles and Rain Boots and share them on Instagram. Thank you for allowing me to spend time with you today and join me in wishing Jennifer the very, very best in her NaNoWriMo competition!
SHARE WITH OTHERS


Hi, Sarah! I don’t consider myself a very crafty person, but when I do make crafts, they have to be simple and cute. These definitely fit the bill. Thanks so much for sharing this with us.
Heather,
As long as you keep those fruit bar recipes coming, I’ll ship you the crafts! :)
Why don’t you just come over with the crafts and I’ll make you some bars and coffee?Just remember to bring Jennifer with you! :)
Crafting, fruit bars, and coffee… I’m in!!!
I also am not crafty, but agree these look easy and fun enough to try to make. Thanks so much Sarah for sharing and can’t wait to try with my kids now :)
I love these! I’ve pinned them, too!
Thanks so much for the Pin, Tara.
I came across one of your “Free and Cheap Kindle Books” post on Pinterest – I said, “Hey! I know her!” :)
Hi Sarah and Jennifer! Ok, I giggled a bit over the power-tool insight. I am useless at that stuff too :)
I have grandchildren starting to enter the DIY stage, and these ideas are great! I like that I can use scraps of things I have around the house. And…I am the proud owner of a glue gun! (Don’t like to brag, but there it is!)
Your daughter is a sweetie, and I bet she’ll grow up appreciating your talents! Thank you for sharing this fun craft with all of us.
Blessings,
Ceil
Ceil,
With all of the crafting I do, scraps must be part of our crafting otherwise I’d feel like I was wasting things, you know?
Thank you for the kind words and I hope you have a wonderful rest of your week.
As a mom with a toddler these are right up my alley. She also likes to pour on the glue. I think I might try these this weekend especially since we’re covered in snow here. :)
Amanda,
I hope you get to try them – it sure helps to have a few rainy / snowy day crafts in your back pocket, especially with toddlers. I think I’m going to have to start buying glue by the gallon!
Thanks for commenting, Amanda. I’m so glad you did because I loved your Toddler Book Talk Tuesday – such a great series!
Thank you Sarah. It’s been great writing it. I’m a huge fan of books and I was amazed that my toddler has picked up the knack of “reading” as well. It’s also fun sharing new books with my readers.
What a cute idea! Seems like an easy enough project to do with little ones. I am learning to accept that I am not a super crafty person like I once thought I was. Probably b/c I don’t have the time, but I think this would be a fun one to set up for the holidays. :)
Tiffany,
This is definitely a quick set up. With a little newspaper down on the table, it also cleans up quickly.
I just need to say that I am loving the new look of the blog! Congrats on making the move and Erika S did a wonderful job!
What a cute collage ornament idea! We have lots of ornaments (and too little tree) but these would make an adorable window banner! Thanksgiving needs to get done with quickly so I can start making all the adorable Christmas crafts I’ve been finding! Or wait, maybe I should be enjoying every moment? *taps feet impatiently*
Amanda,
We think alike! I often find myself a bit impatient through Thanksgiving only because I don’t like whole turkeys sitting on the table (I have this weird thing about seeing them all trussed up). :)
I like your idea for a banner – these are currently strung along my daughter’s window because she didn’t want to put them away until after the holiday. She said, “It’s always time for Christmas love, Mommy,” and that kind of sealed the deal to keep them hanging.
I’m pretty challenged when it comes to crafts, but would like to do more DIY stuff with my girls. These seem easy enough and very pretty! Thanks for sharing!
Celeste,
I am still behind on my Bloglovin’ feed, so I just read your zombie survival post – I have just started a Google alert to find one out here. How much fun was that?!
Your girls would probably like the wooden shapes more so than the cardboard. The older kids I set up crafts for definitely like the sparkle they can add by gluing massive gems on them. :)
Everything really is better with glitter, well everything except for my kitchen floor. Although the last time it ended up there the baby had a ball rolling in it!
These ornaments are so very cute and I love that Elsa and Anna are cheering on your little crafter!
These are adorable, and they are also pinned! Thanks for sharing, I’m quite sure my kiddos will enjoy making these :)
XO
I love them. I’m not a crafty person so I sometimes forget that kids are, especially my kids. And to my daughter, there is nothing better than homemade ornaments. She’s the best tree decorator in the world, according to her!
aww these are really cute! You and I had a thing for recycle material crafts :)
I absolutely love these and can’t wait for my daughter to be old enough to make it. I’m saving it for next year when we won’t be traveling abroad and she will be old enough to make them. :)
When my two were younger we used to love making Christmas decorations, some, like an extra long paper chain has survived the years of being dragged in and out of its box.
Your idea of making tree hangings with old card and scraps of material (not forgetting the glitter and eyes, of course!) is so simple that it’s ideal for encouraging little ones to get all crafty.
ps – I love your daughters tee-shirt!
Love these scrappy ornaments :) How cute that she was wearing that shirt and wanting to add glitter lol. I too love shiny shiny on my ornaments!
My youngest made me a book mark at school using a similar method about 10 years ago, it was just so pretty and I still have it now! It’s lovely to see ideas for kids where you know the results are going to be great.
This is such a cute idea and seems simple enough even I could pull it off, since I am not the most crafty person on the planet! Pinning for later!
Yay Sarah!!!! She is a seriously clever crafter and an apron making master! These ornaments are so cute, I wouldn’t expect anything less from her!
We’re going to be making these ornaments this Friday! I’m so excited. I love Christmas!