
I have been wanting to publish the plans for this project for quite some time now. I hope you enjoy the story of the creation of my daughter’s play kitchen.
For my daughter’s second birthday we wanted to buy a play kitchen for her. As we shopped around, we quickly became aware of three things:
1- Play kitchens are very expensive
2- They are huge
3- Not very many play kitchens would match our decor (which means a lot when you live in a small townhouse)
So I proposed to my husband that we BUILD the kitchen. I did some research online and got some basic ideas… then we went shopping.
Here’s the pictorial diary of our play kitchen creation.
Check out this fabulous DIY project and make a play kitchen for kids! #diy #kids Share on X
STEP 1
We bought one small pine end table from IKEA for $19. This table served as the foundation for the play kitchen. Everything was built around this key piece.

STEP 2
We purchased a small stainless steel dog dish from the dollar store and used it for the sink of the kitchen. My husband traced the dish onto the surface so he would know how much of a hole to cut out for the “sink”.

STEP 3
My husband then cut a small piece of plywood to attach to the the back of the kitchen. This piece would serve as the back of the stove.

STEP 4
A small piece of plywood was attached down the centre of the table. This piece would allow for two doors to be added to replicate cabinets.
My husband decided to get creative with the paint and replicate the quartz counters we have in our own kitchen. The rest of the piece was painted with a small can of dark brown paint (which matches the espresso finish on our own kitchen cabinets).

STEP 5
We added a few plastic pipes for the faucet and painted wooden drawer knobs for the oven and sink controls.
Two cupboard doors were added by using plywood and some simple door hinges.
We used “stainless-steel-like” shelving paper for the oven top, oven backing and door. The oven burners were hand-drawn using a permanent black marker.
We added a brushed chrome knob for the cupboard door and a brushed chrome handle for the oven door.

STEP 6
We tried our best to make the play kitchen match our own kitchen.

The backing of the unit is a leftover piece of maple from the previous year’s kitchen renovation.
We then found a great shelf at IKEA for $2.99 (which we painted to match everything else) and added some peel and stick subway tiles that we found at Home Depot (for $1.00 each) to complete the look.

Step 7
Added a battery operated light under the counter. Painted a digital clock (set to 6:56, the time my daughter was born).
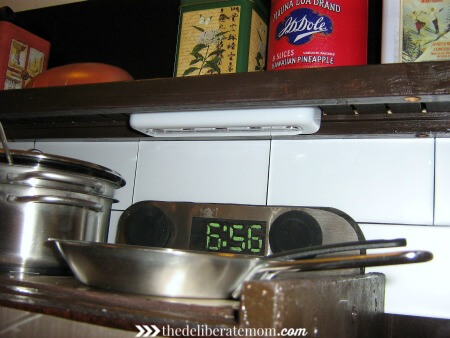
STEP 8
We purchased some simple pieces to complete the look of the kitchen. Pots and pans, tin cans from the dollar store and play food made the kitchen ready to play in!

In the end, our kitchen was about $50! My dear husband did all of the design and construction and I was the interior designer. We worked as a team on this project.
The love and care we put into my daughter’s play kitchen could never be matched by the store-bought kitchens we were originally looking at.

This project also inspired us to create one handmade gift every year for our daughter’s birthday. I look forward to sharing our most recent project that we designed for my daughter’s third birthday… her Mr. Dressup Tickle Trunk.

SHARE WITH OTHERS


this. is. AWESOME.
thanks for sharing! i would never have thought of something like that, but now i am thinking! thanks :)
That is simply too cool! It looks fantastic. We were lucky to be given a play kitchen for free, but I must admit yours looks a lot prettier than ours.
This. Is. Brilliant! My daughter’s birthday is just around the corner, and I’ve been looking for little kitchens for her, too…I wonder if my husband would be up for a challenge????
I love this kitchen.
We also had an old play kitchen handed down to us for our daughter, which has been great. Since having our second daughter, I am now seeing that this old kitchen is very bulky and since the girls will be sharing a room I can’t see us keeping it around (it’s also an eyesore!!). I will be seriously considering this design when we are ready for another kitchen. Thanks, again :)
I love it!
I also just built a play kitchen – you can check it out here.
http://www.utahcountymom.com/2011/07/lilys-play-kitchen-diy-wood-kitchen-for.html
This is awesome!! You and your husband did a great job!
wow! that is very impressive! i love how it matches your kitchen…i’m sure your daughter loves it :)
This is awesome! You did a fantastic job – and you’ve detailed your work so well that you’ve made it really easy for the rest of us. Thanks again for sharing!
This is a truly AMAZING project! I would have never even imagined that you could make a play kitchen and it looks soooooo much better than any of the overprice and easily broken play kitchens they sell at toy stores. The fact that it matches your decor is a bonus! Gorgeous!
Glad I found your blog on bloggymoms.com!
http://www.whatjeanlikes.com
that is unbelievable!!!great job!!- celine
This is so cool and smart!
Marie
Just pinned this. Great idea!!
this is really cool…ans i love that it’ll be totally unique! i’ve been wanting to ask my dad the woodworker to build a unique play kitchen for Pigeon when he’s a little bit older…perfect heirloom ‘toy’!
Goodness me another brilliant idea! I sure would love to try and do this project wt my husband would be fun for the adults and for the children too :) Thank you for sharing!
Wow! My friend, knowing that we are wanting to build our daughter a kitchen for HER 2nd B-Day, told me to check this out. This is awesome!!! I’ve seen a few similar ideas but this one seems to be the most do-able for us! Wonderful ideas!
M&M&S
Wow this is amazing -I just pinned it and tweeted it out, what a great idea! We made our daughter a puppet theater for her first birthday and it means so much more when you work together to make something for your little one. I have to admit it never would have occurred to me that I could even make a play kitchen – what a cool project!
Hi Deliberate Mom,
I love your blog and I was writing to inquire about guest blogging opportunities.
I work for a furniture company and I believe I can share information of value and worth to your viewers while providing interesting blog posts.
Please let me know if you have any available guest blogging opportunities!
I look forward to speaking further with you!
Best Regards,
Kara
AMAZING! I LOVE THIS! I think my boys would love a kitchen but I hate those chunky plastic ones and the “nice” ones are so expensive! I am so impressed by this kitchen, I just love it! You guys are super talented.
Hi Celine! Stumbled across your blog and this post and have to say that this little kitchen is Fantastic!
You and your hubby did a great job on it and the extra details are picture perfect! My daughter would have loved this play station she was 2. Her play kitchen was crude and drab looking and kept in the basement until she was seven. The idea of having the little kitchen match your full-sized decor in your real kitchen so that it can be in the same room, is simply Brilliant!
Well done!
elizabeth
This is absolutely adorable! Love that you built it to look like “mommy’s” kitchen. I’ll bet your daughter loves it. She’s beautiful btw. Stopping by from Sits Facebook link up and sharing on my facebook page this evening. Have a great weekend.
Glenna @ My Paper Craze
We loved building this for her Glenna. We actually do homemade gifts for both of our daughters’ birthdays.
Thanks for stopping by (and for sharing)!
Wishing you a lovely weekend as well.
Omg, how cute is this !!!!
We loved making it Lulu (and now my youngest daughter uses it)… so it was a practical and good project!
Jennifer, this is beautiful! I LOVE the cute, little tin accessories. So innovative!
Hope you have a fun weekend sweet friend!
Sharon
We loved building this kitchen Sharon. It was such a fun project!