Facebook can be a remarkable platform for connecting bloggers and staying connected with readers.
I belong to a few blogging mastermind groups that regularly congregate on Facebook. To stay informed and connected, I’ve made an RSS feed of the Facebook pages for the groups. After sharing my RSS feed with the group, my blogging comrades were shocked. They had no idea this could be done!
Now before you think that this doesn’t apply to you because you don’t blog, you may find this useful information anyway. Building interest lists is a fabulous way to help organize your Facebook feed… so I encourage you to stick around!
Using interest lists to boost your Facebook presence. Check it out! #blogging Click To TweetWhy use interest lists?
I’m an organized person… mostly. When I started blogging, I quickly noticed that my Facebook feed was a mess. There were pages of businesses I liked, mixed among updates from blogging buddies, and personal status updates from friends. I was disheartened that I was missing out on engagements, baby announcements, and exciting news from friends and family.
I knew there had to be a better way, and then Michelle from A Dish of Daily Life introduced me to it a couple of years ago. So, I muddled through and started building my lists.
What I love about the interest lists is that you can categorize things. You can create a list of the businesses you follow, a list of the blogs you read, a list of your friends, a list of your family members, etc. The possibilities are endless! You may want to categorize your lists into your particular interests; Christian sites, homeschooling sites, and budget sites are some of my most perused lists.
Instead of scrolling through my entire Facebook feed, I decide what list I want to look at, select it, and within seconds, all the updates of the members of that list are displayed on my Facebook feed.
How does this help bloggers?
When you create an interest list, you can choose if you want to make the list public or not.
If you make the list public, other people can subscribe to it! Exciting right?
In my mastermind groups, members subscribe to the list and boost one another’s Facebook posts by liking and/or commenting on the posts that show up in their feed.
As we all know, likes and comments on a post make the Facebook algorithms happy, and more people get to see that particular post.
Take that Zuckerberg!
*Note: The RSS feed does not display ALL of the posts in the group. Facebook algorithms are still there and some posts may not be included in the feed. However, the likelihood of having posts seen is a lot higher in an RSS feed than in the regular newsfeed.*
Here’s how you create an interest list.
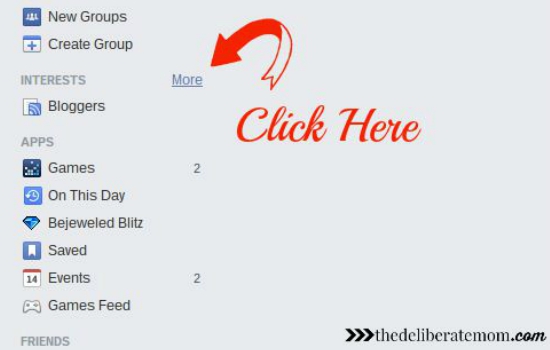
On the sidebar of your Facebook feed, scroll down to “Interests”.
Hover over “Interests” and click the “More” button.
*Note: Sometimes the “More” button doesn’t appear, if that’s the case, click “Interests”.*
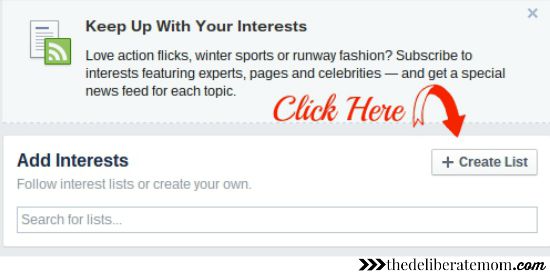
On the following page, click “+Add Interests.”

Then select “+Create List.”
Afterward, decide which profiles/pages you want to add to your list. Will it be mostly: “Pages”, “Following”, or “Friends”? Select all the people/pages/companies you wish to add to the list.

*Note: you can choose between any of these categories but organizing your list is a lot easier if you chose the category that contains the most members that you want included on the list. For example, if you want a homeschooling list, you may follow 24 homeschooling pages and have 4 homeschooling friends. You would want to choose “Pages” since the majority of the list members will be pages. Everything is listed alphabetically, but you can search names and pages too.*
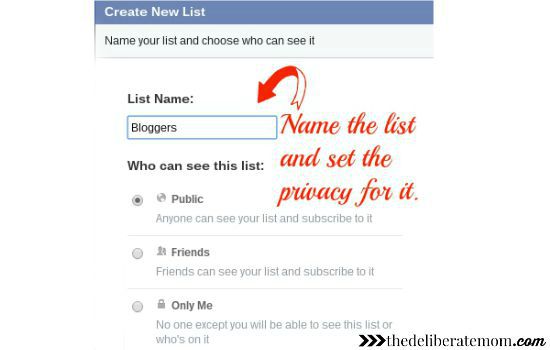
Name your list and set the privacy for it. If you want to share your list with fellow bloggers or associates, choose “Public”. If you are simply organizing friends and pages by interests, you may wish to choose “Only Me”.
There you go! Your list is done!
*Note: I recommend copying the URL of your interest list and saving it to a notepad or word document. When my husband tried this, his interest lists were nowhere to be found. He logged in and out of Facebook and switched between his personal profile and page profile when suddenly they appeared in the sidebar. Perhaps Facebook needs some time to process the list or maybe this is a small Facebook glitch? When I made my lists, I noticed that there was a 5 minute – 4 hour delay for lists to show in the sidebar. Regardless, the URL is helpful if your interest list doesn’t show up or appear in your sidebar (you can send FB a message to get assistance).*
Your RSS feed of your list will appear under the title you gave it and can be found under the “Interests” category in your left sidebar.
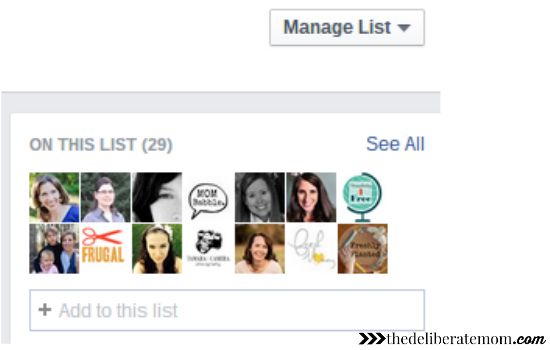
If you ever want to add pages or people to your lists, simply click the name of your list.
On the top right-hand corner of the RSS page/feed of the list, in the box labeled “+Add to this list” type the name of the person/page you wish to add.
*Note: If you’re building a public list that is related to your blog or business niche, make sure to include your Facebook page in the list as well!*
Also, if you want any of your interest lists to appear higher up in the sidebar of your Facebook page, click the gear icon beside the list’s name and select “Add to Favorites”.

How to invite others to follow a Facebook feed.
As mentioned previously, inviting others to follow a Facebook feed is a wonderful way to build community and helps to boost your Facebook presence.
Here’s how you invite others to follow a Facebook feed:
Click on the interest RSS feed link in your left-hand sidebar.
While on the page of the Facebook feed, copy and paste the Facebook URL of the feed.
Invite people to subscribe to the feed by clicking the follow button (pictured below).
Remember, if you want to share with the public, your initial interest list needs to be public. If you only want friends to subscribe and see the list, then choose friends only, if you want no one to see the list, make sure it’s set to private.
So that’s how you build interest lists on Facebook!
Do you have interest lists? How have interest lists helped you to organize your Facebook feed?


This is certainly interesting and I just might check out how it could work for me! :)
I like having an efficient way to scroll through my Facebook feeds. Please let me know if you try it! I would be interested in knowing how it works out for you!
Wow, this is so smart! As I’ve started liking more Facebook pages and trying to build my blog my newsfeed has gotten so messy too. I am excited to try this to keep stuff organized and separated! Definitely pinning and trying soon. :)
Have you ever written any posts about blogging mastermind groups and how you joined them or created them? I’d love to read more about that!
It is a fabulous way to organize your Facebook feed, Lauren. There’s sometimes a lag time before your feed is visible, though. I didn’t know this when I first started creating my feeds. I thought it wasn’t working and I kept on making the same list. Then all of a sudden I had several of the same RSS feeds in my sidebar. lol
I’ve never written about mastermind groups. I joined my first one in December and was invited to a couple more shortly afterward. I guess since I didn’t create it, it didn’t occur to me to write about it.
Whoa!! This is good! I need to do this step by step! Thanks for sharing! Great to know!
It’s a fabulous way to organize your Facebook feed. Just be aware that there can be a lag as to when Facebook actually displays it in your sidebar. Let me know how it works out for you!
I remember when Michelle wrote about lists! It fascinated me but I never did anything about it.
This is very thorough and informative and includes images, because I need words and images as instructions. My brain doesn’t do well otherwise!
Ha! I’m a need to see it kind of gal too (hence the pictures)!
I love having an organized Facebook feed. I just selected my topic and indulge!
This is so helpful! Since I started blogging, I have so many more pages on my feed. I feel like I miss out on a lot of updates.
I’m so glad you enjoyed this! Yes, I find it helps me keep track of things a lot better. An organized Facebook feed?! Yes please!
Oh my gosh mind blown! I had no idea this was possible…. I want to do it now, but don’t have the time.
OK, I will just add it to the #BlogStaycation to-do-list!
Thanks for sharing!
Yes, add it to your Blog Staycation list for sure! It will make a huge difference in your Facebook feed and interactions!
Hi Jennifer, sorry, it’s been a while, but I’m glad to see you haven’t lost your touch! What a great post for anyone who uses FaceBook for anything! Being able to sort things into separate feeds would certainly make things tidier and easier on the eye and brain!
xx
Thanks Debbie! I’m glad you enjoyed this! It makes a HUGE difference to your Facebook feed. I love having my feed organized.